Saturday, October 29, 2011

Marble Mazes TUTORIAL


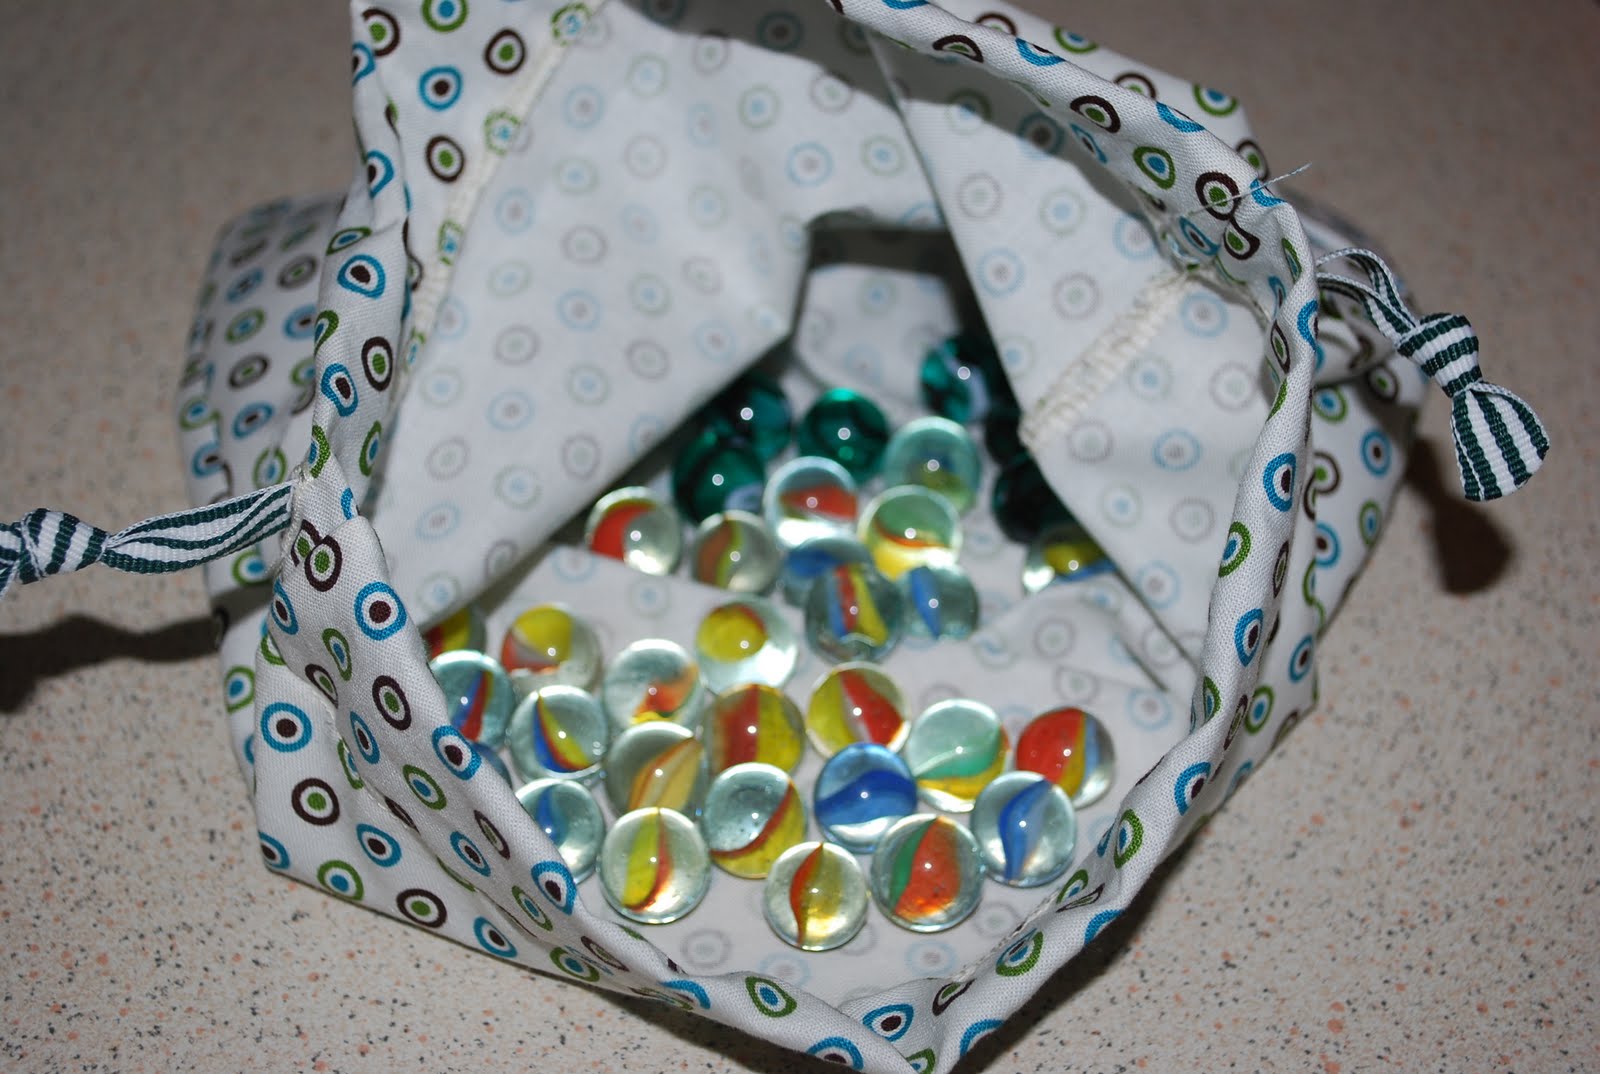
Marble mazes are a fantastic QUIET activity for the children, plus involves fine motor skills for their little fingers and hands to push the marble around.


HOW TO:

1) To make the pattern size I used, I simply folded and A4 piece of paper in half and cut two piece of fabric to this size.

2) Leaving approx. 5cm turning gap on one of the short sides, sew around using the .5cm seam guide.

3) turn in the right way, making sure you push the corners out with something such as a pen, paint brush or scissor tip if you are very careful.

4)2 maze patterns can be found here.
My advice is to print this out, and keep as a master copy.
Then for each marble maze you make, simply trace over the lines with tracing paper or baking paper.
You can then pin this to your fabric with the marks on the top near your turning gap, sew straight over the top of the maze lines, and rip the paper off once you are done.

Much easier than remeasuring and ruling on each marble maze if you are making a few. And making sure your drawn on lines wash off.


5) REMEMBER TO PUT THE MARBLE INSIDE, push it around the maze a little so it is in the centre and out of the way, now top stitch all the way around.

And you're DONE!
It's that SIMPLE!


Drawstring Bags are the BEST!

Not only are drawstring bags very simple to make, but also one of the best storage solutions for all sorts of things!

Faced recently with a dilemma on how to store these 3 puzzle sets that were very similar to each other, and didn’t quite fit in their own boxes if you had just ONE piece jumbled up, which meant juggle pieces between the 3 boxes... WAY too time consuming, and kids wouldn’t even bother trying to fix if the lid didn’t slid on.


So I whipped up a drawstring bag!


For years we have stored the Ka-Plunk marbles in a fruit mesh bag, and I mean YEARS as its the same set my brother and I use to have as kids. It was starting to kind of stick together where it was knotted, making it hard to open (and the kids couldn’t master a knot as it was, let along slightly stubborn one)

So I whipped up a drawstring bag!

Wonder what else I can bag up...?


Monday, October 24, 2011

Welcome to MY space.

I thought I would show you where I create and spend a lot of my time sewing.
I love my sewing nook, and I say nook, because the rest of the room in my youngest son's room (though his toddler bed is in our room at the moment, but that’s another story)

Just a little bit of warning, I am a neat FREAK!
So it is organised to the max.(I promise this is how it always looks, and not just tidied up for the photo), this is how it HAS to be when I walk away from it, and am done for the day.

It does get a little messy while working, but I really can’t work in mess, so even that isn’t real different than what you see here.

Here is what the book case consists of:
My patterns are in the green basket on the top shelf, any I have traced are in a folder on the bottom shelf.
How fantastic is this organiser caddy! I cant even remember which facebook page I bought it from, hopefully it will come back to me soon!
And my inspiration board and pocket frame help keep everything I need above me. (Though I think I need some more photos and jazz it up a little more)
And when I am using the overlocker, I tend to pull this little table out and away from the desk.

Friday, October 21, 2011

Fabric Covered Book TUTORIAL

Unfortunately, I don’t have a ready to use pattern for this, because ALL books are different, you have the spiral version or bound books. As well as the spine being different thickness, day to a page or week to a page diary views. And then not to mention if you start going for A4 or pocket size books!

But I do promise this method works for all kinds of books, easy to follow, and will allow you to whip up beautiful fabric covered books in no time!!!!


HOW TO:

1) Firstly, work out which fabrics you would like to use for the outer and the inner.
If you are making A5 size like I am, you will need 50x30cm of both of these, as well as a medium to heavy interfacing/stabiliser. You will need slightly bigger if you are planning an A4 sized cover.
(You can get also get fancy and create a patch work or panel piece for the front to add more flare)
2) Lay fabrics right side together, and the interfacing on top (or if you are using iron on interfacing, iron this to the back of the fabric you want as the outer), and pin it in a few places to secure the layers together.
3) If you have a good eye for positioning your book centre of your fabric, then go for it.
Otherwise, fold your fabric in half-length ways, and press. I have drawn a line on my interfacing so you can see the line we are looking for.
4) Open the book and position the spin along this line, and draw around the outside of the book. (Use a washable marker or pencil in case it will be visible through your fabrics, however I used biro so you can see, and I have dark fabrics)
5) We now need to add seam allowances.
On the top and the bottom (or long sides) measure and mark 2cm from your original line.
And on the short side you will need to add half the size of your book's cover PLUS another 1cm on either side.
6) Leaving an opening of approx. 5cm for turning, on ONE of the short sides, sew around with a 1cm seam guide.
Snip your corners as close to the stitching as you can.
7) Turn the right way and top stitch both SHORT sides only. (I also add my tag on at this step)
8) Fold your fabric in half-length ways again, this time slip your book in so that the spine sits in the fold.
9) Lift up the front cover, and tuck the top flap inside.
10) Repeat with the back cover.

11) I now feel where the bottom edge of the book is, and pin through all layers, including the flap.
12) Taking the book back out, I sew all the way across where I have pined.
If all previous measuring, marking and sewing as been straight, this SHOULD be 1cm seam guide again.
And you're DONE!!!
It's that SIMPLE!

I also tied, and secured in place with a few stitch in a couple of places, a ribbon bow around to jazz the book up a little and also secure it closed when needed.


Wednesday, October 19, 2011

Easy to Make Tangram Puzzle


I loved these puzzles as a kid, and I knew my kids would also, so I thought "That would be easy to make" (yes, probably just as easy to buy, but I hate dragging 1-3 kids, depending who's school day it is, to the shops with me HOPING to find what I am looking for)
This is one of the many busy bags I have made, and I will be listing a few more in the near future.

HOW TO:

1) Using this guide, I folded my square piece of paper where the black lines are, and drew the red lines on using a ruler.

2) I bought a packet of coloured foam sheets off eBay (because of the convenience of online shopping) but can be found in most craft stores and cheap shops.
I cut one of each of the template shapes on a piece of coloured foam (I was actually making 7 sets for friends at the same time, so none of my foam was wasted, but could always be made of one colour if preferred also)

3) I then printed out some picture patterns, cut and laminated, for easy visuals to recreate out of the shapes. (Printable version can be found here.)


And you’re DONE!
It's that SIMPLE!

There are many more tangram templates on the net, simply by Google different word combinations of "tangram templates" or "tangram puzzles"
I even started choosing particular pictures I was hoping to find "tangram boat"
These were my favourite, simple to start with pictures.
Keep an eye on the printable as I may add some more as my children progress past these ones.


Saturday, October 15, 2011

Please Stay and Have a Cuppa

Every year, I try to make at least half of the Christmas gifts.

Especially to school teachers, friends, some family members, and the lovely ladies who organise the playgroup I attend.

Admittedly, it does work out cheaper for me, but I think that also has a lot to do with making the same item for everyone, so I can buy supplies in bulk.
But I do also prefer doing it because I love to sew, therefore I am giving a gift that I am putting as much love and care in to as possible!


This year, I stumbled upon a "Tea Bag Wallet" and thought that was a fantastic gift idea!


Octonauts To The Rescue!


I had never heard of this show before, but in one of the many craft/gift swaps I am involved in the mother had mentioned it as one of her son's favourite shows and book.

I first had plans to look up what the characters looked like, and see if I could create a soft doll type of concept for the characters, but I was super excited when I was able to find a couple of crochet patterns!

Not all of the main characters had patterns available for them, (I believe there is about 4 of them?) and I'm sure I could have changed the colours and altered their features to create the others.

Here are the patterns I used, save you hunting for them also :)


Captain Barnacles
Kwazii

Friday, October 14, 2011

Hankerchief Infinity Dress


This isn’t the first infinity dress I have made, and I am sure it won’t be the last either.

It is such an easy dress to make, and so versatile with how you can wear it, and even more so when it is so easy for you have one in every colour!!!

I had visioned this dress after an episode of Winners and Losers, I knew I wanted a dress similar to Sophie’s (second from left in case you don’t watch the show ;)), with a colourful print as the skirt part, with a handkerchief hemline, and a black top/strap area.

I was even more thrilled when I found the floral print fabric for $2 a metre at Spotlight.
The black stretch fabric was found in the remnant bin for something ridiculous like 60c!
The most expensive part of this dress was the lining, which was $7 a metre.

In total this dress cost me less than $10, and no more than an hour or so to make!

The flower, made from left over scraps cut from the waist circle hole, has both a safety pin attached so it can be worn as a brooch on the dress, or cardi when needed, and also a bobby pin, so it can be worn in my hair, depending on my mood.

Thursday, October 13, 2011

Cheeky Monkey Duo

I was approached through my business about donating an item to an upcoming charity auction, and if possible an item for a girl and an item for a boy.

I knew exactly what I wanted to make, as it has been in my "I'd-like-to-make-one-day" list.

After checking with, Larissa at mmmcrafts, if I could use her free pattern for the auction item.(As I wasn’t sure on rules about selling an item made from someone else’s pattern, even if I'm not making a profit myself, always best to check.)

I made my version of Molly Monkey and adapted the pattern to make a boy monkey (however a Mike Monkey pattern can be purchased here)


I drafted his removable shorts myself (including a hole for his tail, LOL)
And I was thinking, once auction bids reach a certain amount, I will be including extra skirts and shorts so both monkeys can be dressed during playtime.

Once the auction goes ahead, I will post further details to let you know when it has started.

Wednesday, October 12, 2011

Giddy Up Cowboy!

Hobby horses are FANTASTIC! And nothing better then a handmade one I believe :)

I finally got around to making this hobby horse for my two year old son. Now he can stop riding his toy broom around the house.


I found a very easy to understand tutorial and printable pattern at Designs By Kasia

I HAD to include the "Wanna be a Cowboy by Riley Blake" fabric, but I only had scraps left, so I sewed them together to make the reins.
For the head I used soft denim, I think of Cowboys wearing denim so seems fitting to me (plus I didn’t have a brown fabric to match the Riley Blake fabric).... Goes together much better, I think!


Sock Animals

Who knew there were so many animals you could create from a pair of SOCKS!
And many of the tutorials are free and easy to find online.

Here are just a few of the animals I have completed lately:

Who wouldn't love a rainbow monkey in a tutu?

The tutorial I used for this can be found at Web-Goddess, I love its step-per-page layout.

This mummy and baby dogs were made from this tutorial, found on Create Studio
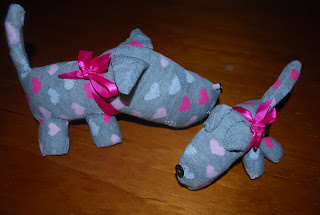
The mummy dog only requires one of the socks in the pair, so I HAD to make a baby dog to go with it :)
I just used the same concept, making everything smaller scale, including cutting the body in half, along the length of the dog.


Next on my "Sock To Do List" is:
Dragon
Zebra
bunny
Hobby Horse
Owl
(Just to name a few other tutorials I have already come across)

So keep your eye out for those in future entries....

Cupcakes For The Diet Concious

Wouldn't we all like to enjoy something sweet without it going straight to our thighs or feeling guilty about have ANOTHER!...How about some cute crochet cupcakes? (Can never have too many of these either!!)

Ingredients:
chocolate brown wool for cake
coloured wool of choice for icing
long beads or multicoloured embroidery thread for sprinkles
soft fill to taste

Method:
CAKE
1) 6 sc in cirlce
2) 2 sc around (12)
3) 2 sc around (24)
4-10) sc around (24)
finish off and sew strands in.

ICING
1) 6 sc in circle
2) 2 sc around (12)
3) 2 sc around (24)
4-8) sc around (24)
9) 5 sc next st, skip next st, repeat around
finish off, leave tail long enough to sew icing on to cake.

CONSTRUCTION:
stuff cake
sew icing onto cake, just above the ruffles so they flare out
leave opening to stuff the icing and make sure cake is right shape
sew closed
sew beads or coloured thread scattered over the top of icing


And you're DONE!
It's that SIMPLE!
ENJOY!