Thursday, March 15, 2012

In The Hoop Embroidery


As if I didn’t love my embroidery machine enough as it was... I have now discovered "In the hoop" designs... where EVERYTHING is done within the embroidery machine hoop, with programed stitching!

So, to add to the gift drawer are 4 love heart coin purses.
And yes... it sews in the zip and everything!!!!!

If you would like to check out the design I used, it can be found here.

Electronic Reader Cover and Stand

With the help of Made by Marzipan's I adapted this tutorial to fit my mum Ereader.

Art Journal

A BIG thank you to LBG Studio for my new favourite tutorial that has become my main gift drawer stocking, the Art Journal.

I have made 4 of these so far, with many more planned as the stock gets low.

I have filled them with a mixture of sketch books, notepads, colouring in books, and stickers.
Plus the essential colouring in pencils and lead pencils.


Boys and their Tools

Last minute birthday invite (well only last minute hubby telling me!)
So I now have to make a gift the day before the 1 year olds birthday party!

Thankfully after 3 boys, I know how much they like tools and especially a tool belt to wear!

So teamed up with the drawstring bag from the previous tutorial post, I whipped up this cute tool belt.

Saturday, February 18, 2012

Drawstring Bag Tutorial


HOW TO:

1) Work out the size you would like your bag to be- if you have something in particular in mind to go in the bag, use this as a guide and then make your measurements larger then this item.

If you will be making multiple bags the same size, it might be wise to make a pattern out of some paper- easier to measure and mark on paper then fabric.

Cut two pieces of fabric- no rule whether your bag has to be rectangle or square, this is up to you.
(Or you can cut one if you place the bag base on a fold.)

2) With fabric right sides together, pin and sew/overlock 3 sides together. (In my case, my bottom seam is actually the fold of my fabric so no need to sew)

3) I overlock the edge of my opening at this stage, if you don't have an overlocker you can do a zigzag stitch right on the edge of your fabric, or during the hemming you can folded it over twice.

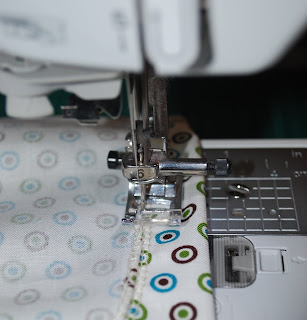
4) With a button hole foot, choose the size of the hole you will need, based on the size of ribbon/cord you will be using to close the bag.
I normally use two ribbons/cords to close the bag as you can tie it more secure after drawing it closed, which will mean you need two button holes. One works well also.
Using the top of the button hole window as a guide to make sure I get both holes the same distance down from the top, I place the right edge of the foot against the left of the side seam on both side.
5) Using a quick unpick, carefully break the fabric fibres between the button hole stitching.

6) Fold the top hem down and sew all the way around- make sure where you are about to sew is below the button holes, if not, make your hem a little wider.
7) Turn bag in right way and feed ribbon/cord through button hole and back out the same button hole, tie off and repeat with other button hole.

And you're DONE!
It's that SIMPLE!


Friday, January 27, 2012

Tooth Pillow

We have wiggly teeth! Yay! (Mr 7... not me... I don’t think I would be "yay-ing" if I had wiggly teeth)

Being in the top bunk, it may be a little hard to reach under his pillow in the night... so a tooth pillow is just what we needed.

And a pirate one at that!


The eye patch is a pocket for the tooth and money.

I have intentions of using the back of the pillow to record date and age of each tooth lost, as a bit of a keepsake!


Now to sit and wait for these teeth to come out.....


Mini Organiser

I am a BIG fan of note books, stationary and all things drawing and writing... always have! (I think it drove my mum crazy when I was younger to be honest)

So I couldn't help but make one of these "organiser wallets" for myself.

And while I was at it... whats another 7 more to add to the gift drawer!

(Usually this drawer consists of items I have found on special for the kids friends birthday parties that often spring up suddenly, but this year I hope to have more handmade items in this drawer ready for Birthdays or Christmas. This particular item may be more suited to adults, but I’m sure there will be some little girls out there that like notes and drawing also)

some other versions i have done, is remove the curved pocket, and make the large on in to a mini pencil holder


Tuesday, January 17, 2012

Ready for Back to School


Mummy is definitely ready for school to go back.... no, they haven’t been TOO bad these holidays... sometimes....

Sunday, January 15, 2012

Dress up Party

I love planning parties!
I let my children choose the theme of the party they would like, and LOVE basing games, food, party favours and decorations around that theme!

However when my 4-going-on-5 year old chose "Dress up/Costume Party", I found it a little challenging looking for ideas, as most similar parties were either Halloween or for little girls tea parties.

But I think we go there in the end...

In the party bags we found some stickers with cats and dogs dressed up in outfits (LOL), glasses with a fake nose and moustache.
As well as the usual balloons and lollies etc.

We even managed to have some special guest arrive at the party....

Camping Activity Bag

Just recently we went camping, the first time ever for my kids, my first time in 13+ years, and therefore my first one I was in charge of catering and packing other peoples things.... so of course I forgot to grab some quiet time activities!

 
I decided to get better prepared for next time....

Each bag has a range of quiet time activities:
  • Colouring books and activity books
  • Kids magazine (such as Disney or Kzone etc)
  • Playing cards (in previously posted card pouch to match their bag)
  • Handmade pencil case to match, filled with colours
  • Handmade car pouch (though not sure how much dirt play I will encourage when we are on a shower free campsite!)
Dont forget my simple drawstring bag tutorial to help make your own bag of goodies.